Unlike traditional Hard Disk Drives (HDDs), which use physical, moving parts to write and retrieve data, SSDs rely on flash memory, an electronic method that offers superior speed, performance, and reliability.
By moving your OS from an HDD to an SSD, you can significantly reduce boot times, accelerate application launches, and provide your system with a general boost in responsiveness—a noticeable improvement in everyday use.
Whether you’re looking to breathe new life into an aging system, seek faster load times, or aim to reduce strain on your primary drive, migrating your OS to an SSD is a worthwhile consideration.
In this article, we’ll walk you through this process using a free partition manager, illustrating how this task is easier than you might think.
Understanding the Basics of SSD Migration
SSD migration involves moving your operating system—the master program that runs your computer, like Windows or macOS—from its current location (usually an HDD) to an SSD.
So why would you want to do this? For a start, it’s about speed and performance. SSDs are like the superheroes of storage devices, able to read and write data at a pace that leaves HDDs trailing in the dust. Have you ever been frustrated with how long it takes your computer to start up or load applications? Migrating your OS to an SSD can help with that!
But it’s not just about being faster; it’s also about longevity. Running an OS from an HDD can cause wear and tear on the drive over time. By moving the OS to an SSD, the HDD isn’t under constant strain and can potentially last longer, saving you from unexpected breakdowns and loss of data.
But how does one execute this technical-sounding task? This is where the partition manager comes into play. This versatile tool simplifies the process of OS migration, allowing even those with limited tech knowledge to upgrade their system’s drive.
Not only does it guide you through the necessary steps, but it also ensures that your data is transferred securely and efficiently, paving the way for an enhanced computing experience.
Preparing for the Migration
First things first, you’ll want to ensure that all your important data is backed up. We can’t stress this enough! While the process of migrating your OS to an SSD is generally safe, it’s always best to err on the side of caution. So, take a moment to backup any critical files to an external drive or cloud storage. It’s better to be safe than sorry, right?
Next up, let’s talk about space. Your SSD needs to have enough room to accommodate your OS. Check the amount of data on your current OS partition to ensure your SSD has the capacity to take it on. A little tip here: if you’re running low on space, this could be the perfect time to declutter and get rid of any unnecessary files or applications clogging up your system.
Once you’ve organized your space, check to see if your system has connected and recognized your SSD. This should be a fairly straightforward process, but if you run into any hitches, a quick web search or a browse through the SSD manufacturer’s website should offer some troubleshooting tips.
Now we’re almost set to go. The last step in our pre-migration checklist is downloading and installing MiniTool’s free partition software, if you haven’t already done so. This software is your golden ticket to a smooth and seamless OS migration. You can download it directly from the MiniTool website, and installation is as simple as following the on-screen instructions.
Alright, your prep work is done! You’ve backed up your data, checked your SSD’s space, made sure it’s connected, and gotten your hands on the Partition Tool. Now, let’s get to the fun part: the actual migration! Buckle up, because we’re about to speed up your computing world.
Step-by-Step Guide to OS Migration with Partition Manager
So, we’ve got our tools, we’ve done our prep, and now it’s time to roll up our sleeves and dig into the actual migration process. Don’t worry if you’re not the most tech-savvy person around; we’ll guide you through it, step by step.
1. Launch MiniTool Partition Wizard
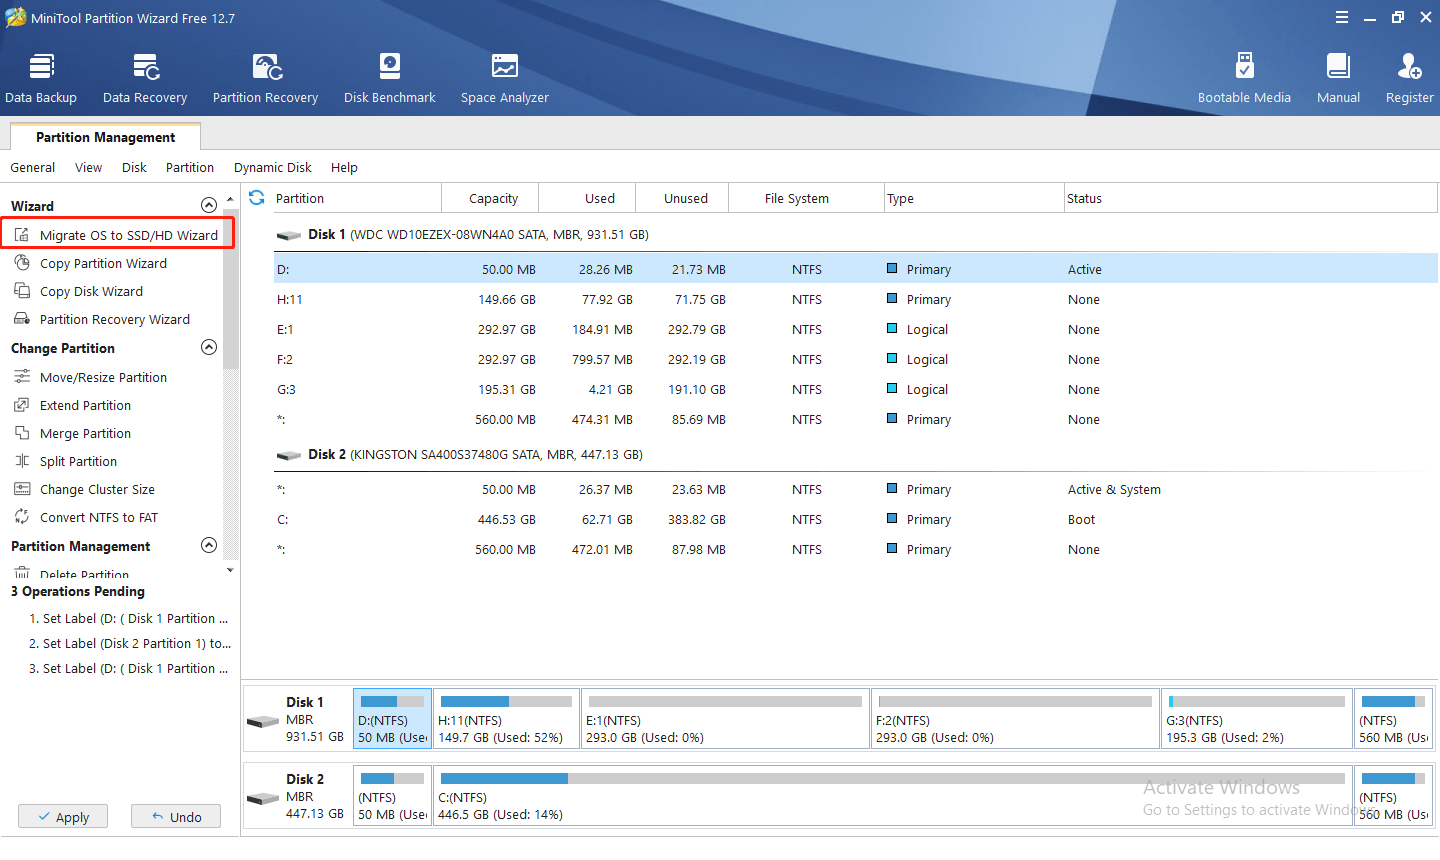
Start by launching the tool on your computer. You’ll be welcomed by a clean, intuitive interface. On the main dashboard, click on the ‘Migrate OS to SSD/HD Wizard’ option on the left panel.
2. Choose the Right Migration Method
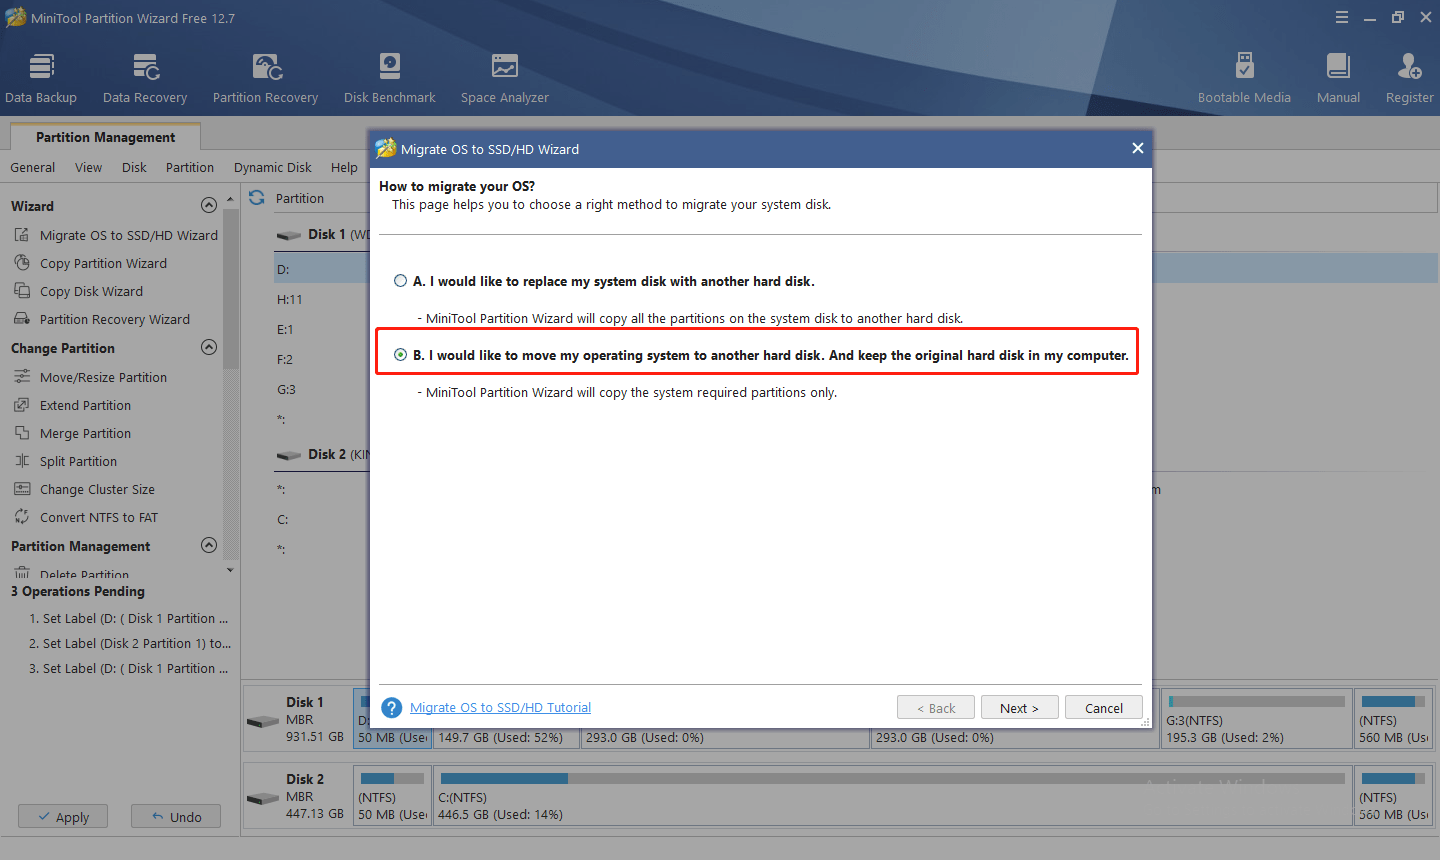
Now, the tool will ask you to choose a migration method. There are two options here: ‘Option A’ allows you to replace the system disk with another one, while ‘Option B’ enables you to migrate the OS only. In this case, we’re going to choose ‘Option B’ as we want to move the OS to the SSD.
3. Select Your Destination Disk
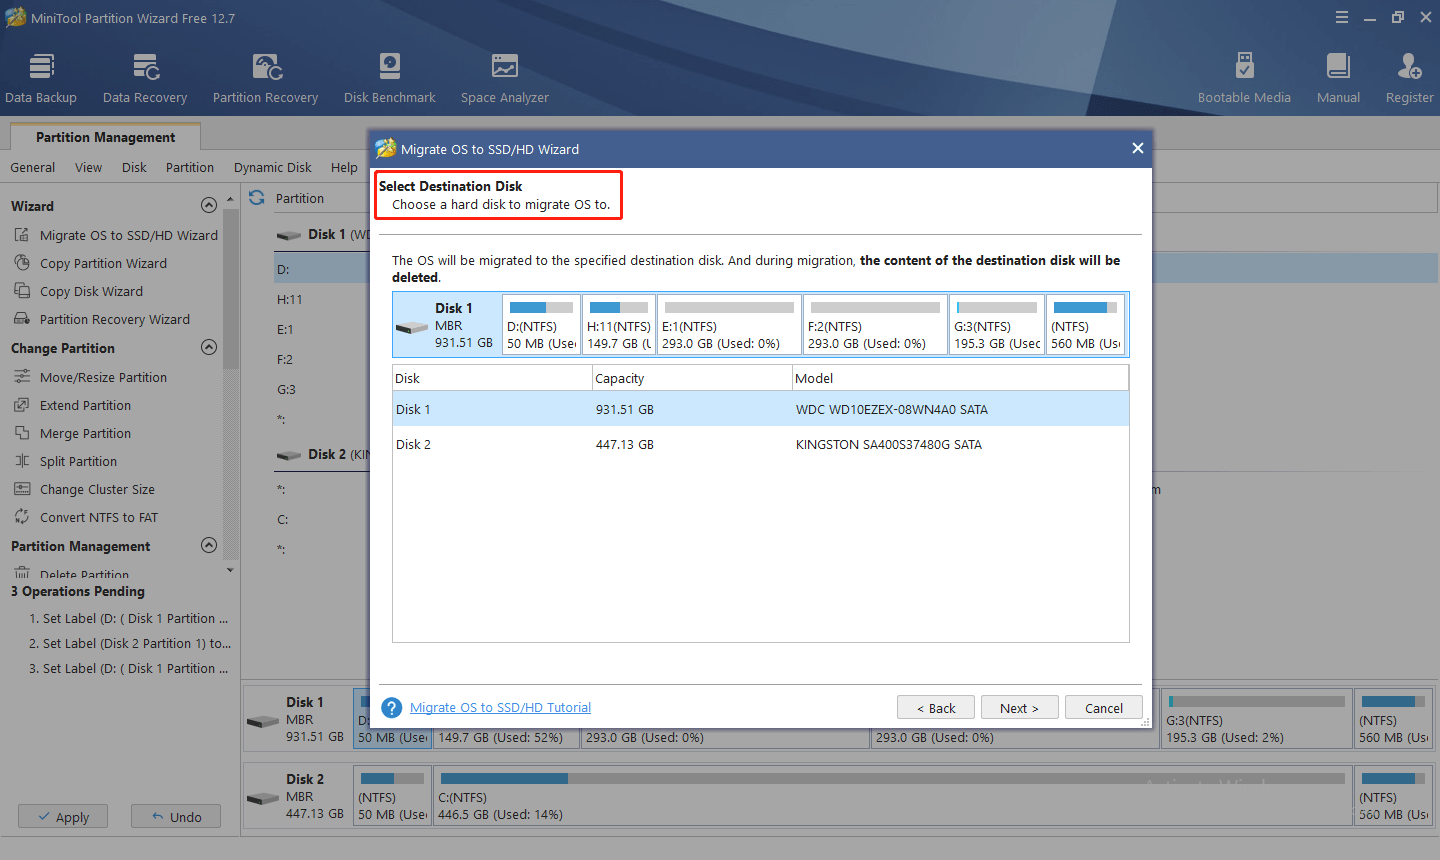
Next, you’ll be asked to choose your destination disk; this is where your OS is moving to, i.e., your SSD. Make sure you select the correct drive here. MiniTool will give you a friendly heads-up that all data on the target disk will be destroyed, so double-check that you’ve backed up any essential data from your SSD before proceeding.
4. Choose Your Copy Options
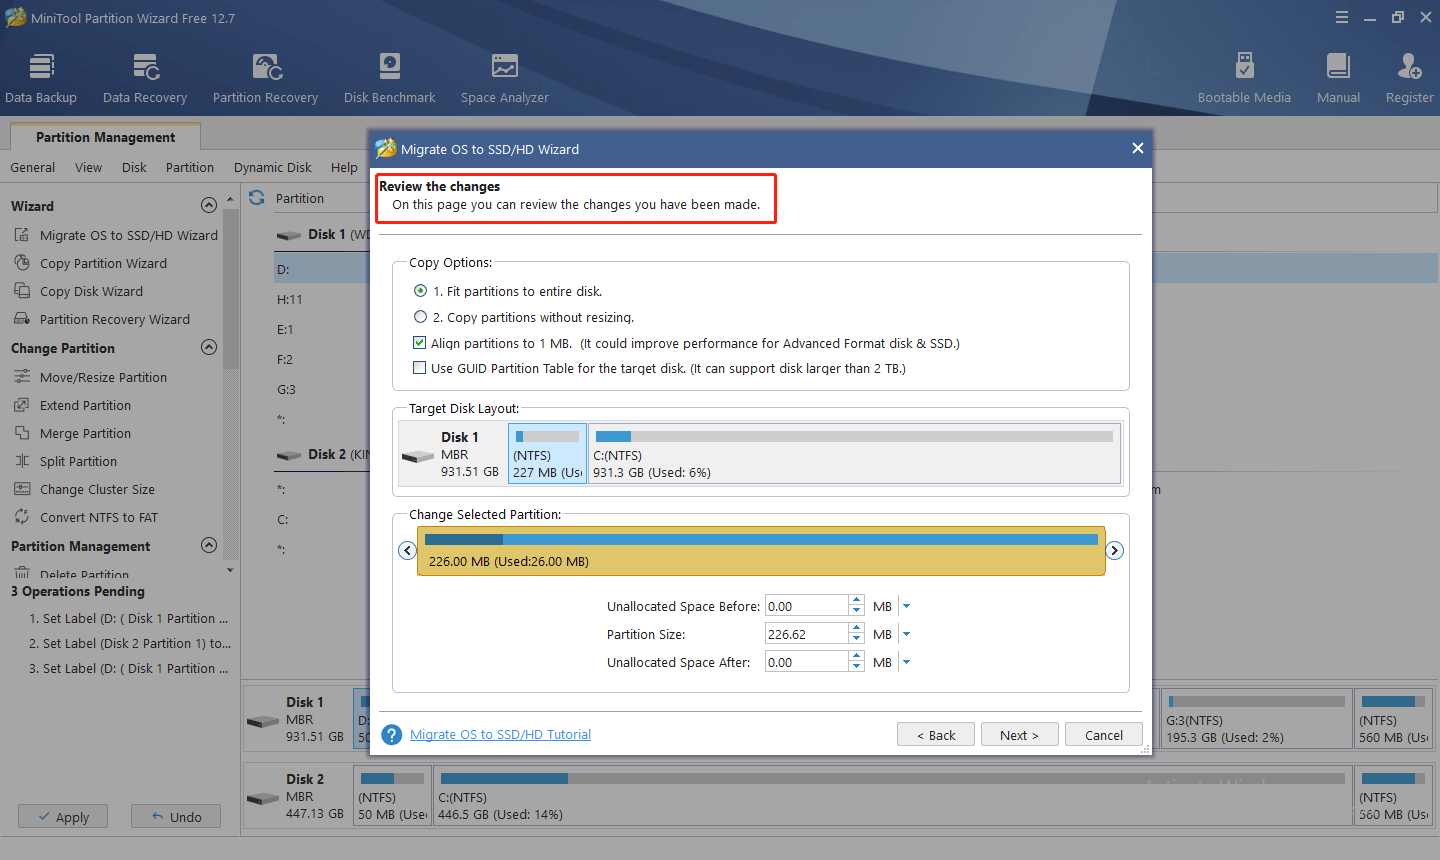
Now it’s time to specify your copy options. You can keep the default settings here, but if you’re an advanced user, feel free to adjust the partition size and location according to your preferences.
5. Apply Changes and Start the Migration
You’re almost there! Review your changes and click ‘Apply’ in the top left corner. MiniTool will now start the migration process. This can take some time, so grab a cup of coffee and sit back while the tool works its magic.
6. Finishing Touches
Once the migration is complete, MiniTool will prompt you to either restart your computer immediately or to do so later. For the changes to take effect, a restart is necessary.
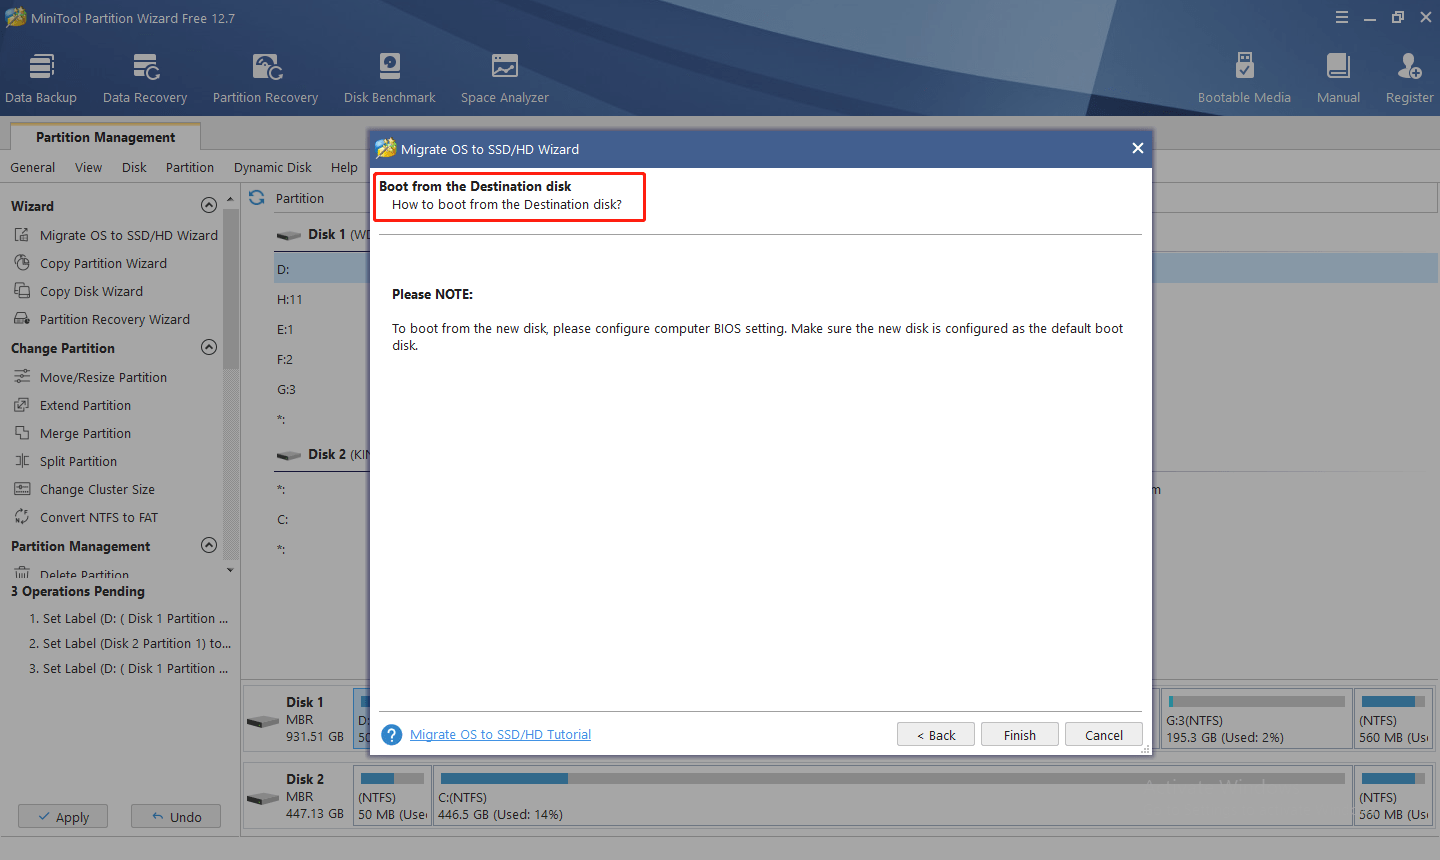
And there you have it—you’ve successfully migrated your OS to your SSD using the MiniTool’s Partition Manager! You can now enjoy the increased speed, performance, and reliability that an SSD offers over a traditional HDD.
Please note that while this process is generally quite safe, we always recommend you follow the instructions carefully and make sure all your important data is backed up before beginning the migration.
What to Do Post-Migration?
So, the hard part’s over, and you’ve successfully migrated your OS to your new SSD. But hold on, we’re not quite done yet! There are a few steps you’ll need to take to ensure everything is running smoothly and to get the most out of your new setup.
- Change Boot Order in BIOS: Once the migration is complete, your computer may still default to booting from your old HDD. To fix this, you’ll need to change the boot order in your computer’s BIOS to prioritize your new SSD. This process can vary depending on your motherboard model, but typically you’ll need to restart your computer, press a specific key (often F2, F10, or DEL) during startup to enter the BIOS, navigate to the boot order settings, and move your SSD to the top of the list.
- Check That Everything works. After adjusting your boot order, restart your computer. If everything has gone according to plan, your system should boot up quickly and smoothly from your new SSD. Take some time to ensure that all your apps and files are working correctly. It’s normal for the system to take a little longer than usual for the first boot, so don’t panic!
- Handle the Free Space on Your Old HDD: Now that your SSD is the primary drive, your old HDD can be used as additional storage. First, you’ll want to clean it up. Back up any files you want to keep, and then format the drive to remove the old OS and any other unneeded files. Remember, formatting will erase all data on the HDD, so make sure you’ve saved anything important beforehand. Once you’ve done this, you can start using your HDD for additional storage.
- Regularly Update and Optimize Your SSD: To keep your SSD in good shape and ensure it’s always performing at its best, make sure to regularly update its firmware and run optimization tools. Many SSD manufacturers offer these tools for free, so take advantage of them!
Congratulations! You’ve not only successfully migrated your OS to your SSD, but you’ve also taken the necessary steps to ensure a smooth and efficient operation. Now, sit back and enjoy the improved speed and performance of your computer.
In conclusion, optimizing performance and ensuring the reliability of your systems are essential. The migration from HDD to SSD is a significant step in that direction. Enjoy the enhanced performance and speed that your SSD brings, and remember that keeping it updated and optimized is key to longevity and sustained performance.
Related Posts:
- Why Partitioning Your Hard Drive Is a Smart Move for Your Data
- Are Computers With No Operating System Worth Buying?
- Security Risks of Using a Multiple USB-C Hub: How to Protect Your Data
- Next Generation of Cloud Hosting: Holo’s Decentralized Approach
- Improve Your IoT Gateway Security: from Hardware to Software
- Are Screen Recorders Safe to Use on Your Computer?
